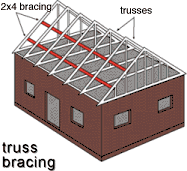
Gabled Roofs Does your home have a gabled roof? If so, the end wall of your home takes a tremendous beating during a hurricane. If not properly braced, it can collapse, causing significant damage. However, gable end walls are easy to strengthen and deserve to be a high priority on your retrofit list. Although truss bracing(shown here) is not endorsed by IBHS, the Red Cross and others recommend it as a retrofit for gabled roofs. To do this yourself, install 2 x 4s the length of your roof, overlapping the ends of the 2 x 4s across two trusses.
Typically, gable end trusses are directly attached to the top of gable end walls. The bottom of the truss must be securely nailed to the top of the wall and braced to adjacent trusses. This prevents wind from pushing or pulling the gable end at its critical point, where the gable truss is connected along the gable wall. Without adequate bracing, the end wall may be destroyed during hurricane winds.
To secure your gable end wall, fasten eight-foot long braces to the bottom chord of the gable truss and the adjacent trusses with sixteen-penny (16d) nails. The braces should be perpendicular to the truss, spaced at a maximum of four feet on center. In addition, be sure to tie back the gable truss with at least one eight-foot long brace, along the ridge of the roof, to several of the interior trusses.
Shingles Shingles are usually not designed to resist hurricane force winds. They come with integral locking tabs or factory-applied adhesives that on occasion do not adhere properly to the underlying shingle because of cold weather installation, uneven surfaces or any number of other reasons. For increased wind resistance, have a qualified person inspect several shingle tabs to see if the adhesive has engaged. If not, use a quick-setting asphalt cement to bond them together.
To cement the shingle tabs to the underlying shingles, place two spots of quick-setting asphalt cement about the size of a quarter under each tab with a putty knife or caulking gun. Press the tab into the adhesive. Be sure to cement all the tabs throughout the roof, being careful not to bend them farther than necessary when applying the adhesive. Replace any damaged shingles immediately.
Attach Roof Sheathing with Adhesive
You can also improve the uplift resistance of the roof deck from the attic -- without removing the roof covering. This is how:
Using a caulking gun, apply a 1/4 inch bead of wood adhesive along the intersection of the roof deck and the roof support element (rafter or truss chord) on both sides.
At places where you have limited access, such as where the roof meets exterior walls, use quarter round pieces of wood approximately two to three feet long and apply the adhesive along the two adjacent sides of the block. The length of the quarter round pieces can be longer or shorter to suit your installation needs.
Press the wood pieces in the intersection making sure the adhesive has made solid contact with the sheathing and roof support elements.
According to static pressure tests, using the wood adhesive can increase the wind uplift resistance of the plywood roof sheathing by as much as three times the conventional method of securing the sheathing with nails. It should be available at your local hardware and building supply stores. Please ask your local hardware expert if other products are available that could provide the same strength and properties as a wood adhesive.
The above information is taken from IBHS's instructive pamphlet, "Is Your Home Protected from Hurricane Disaster? -A Homeowner's Guide to Retrofit."

 Does your home have a gabled roof? If so, the end wall of your home takes a tremendous beating during a hurricane. If not properly braced, it can collapse, causing significant damage. However, gable end walls are easy to strengthen and deserve to be a high priority on your retrofit list. Although truss bracing (shown here) is not endorsed by IBHS, the Red Cross and others recommend it as a retrofit for gabled roofs. To do this yourself, install 2 x 4s the length of your roof, overlapping the ends of the 2 x 4s across two trusses.